
Drawer Runners –
This is an excerpt from “The Woodworker: The Charles H. Hayward Years: Volume II” published by Lost Art Press.
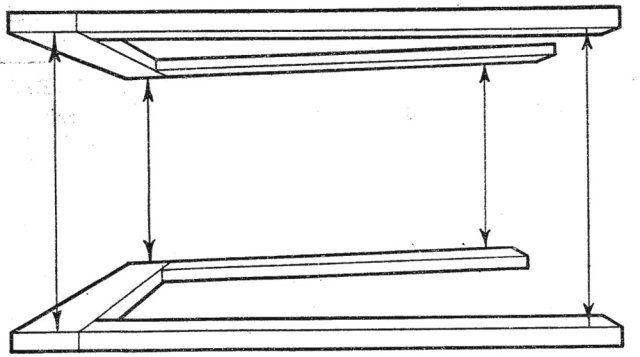
That drawer runners must be strong is fairly obvious, but there are other equally important considerations to be kept in mind. For example, they must be square with the front and be free from winding. The latter point may not always be apparent. Glance for a minute at Fig. 2, which represents a cabinet seen from the side with the end removed. If the distance between runners and guides is measured it might well happen that it would be the same everywhere, and the work might be passed as in order. But the drawers would not run properly owing to the runners being in winding. This is a detail over which it is easy to trip.
When there is just one drawer occupying the whole space in a carcase it generally runs directly on the bottom, and the top acts in place of kickers. In a similar way the cabinet sides are virtually the guides. When there are several drawers, or when the lower part is occupied by a cupboard, however, it becomes necessary to add separate runners, guides, and kickers. The method of fixing these depends primarily upon the construction of the cabinet itself. For instance, the fixing in a cabinet with solid ends is rather different from that in one having panelled ends, because in the former allowance has to be made for shrinkage.
SOLID END CABINETS
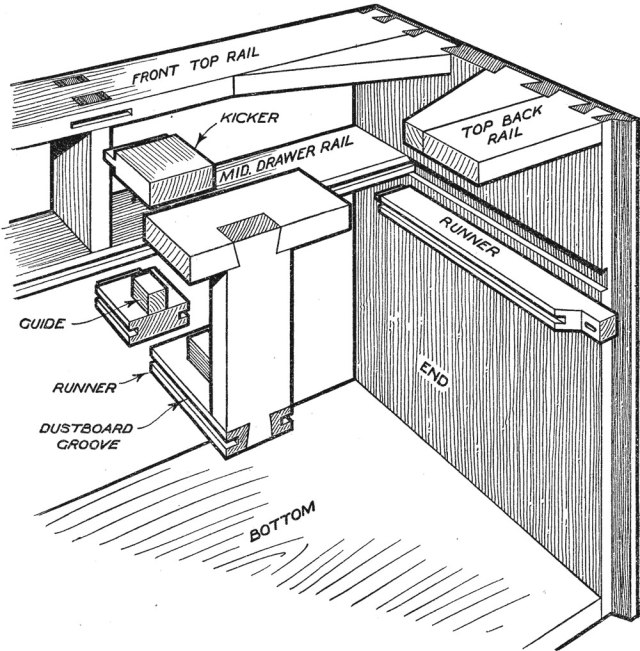
A reliable method for these is given in Fig. 1. It will be noticed that the mid-drawer rail is grooved at the back. This is to enable a dustboard to be fixed, but it incidentally provides a useful means of securing the runners, the front ends of which are stub-tenoned. When no dustboard is required the groove is cut in locally to provide a mortise in which the stub-tenon can fit. The runners are grooved with the plough at the same setting, then when the stub-tenons are cut it is merely necessary to make them line up with the groove.
It will be seen that the runners rest in grooves worked across the ends. This is essential for a really strong job because the grooves offer direct resistance to the downward pressure of the drawers. It is important, however, that no glue is used for fixing because, in the event of shrinkage, the ends would be liable to split. The best plan is to glue just the tenon and drive in a skew nail, partly to force the runner tightly home, and partly to hold it whilst the glue sets. At the back a screw is used, the wood being cut away to remove the groove and to enable a shorter screw to be used. Note that a slot is cut for the screw rather than a round hole. This enables the end to draw along the runner in the case of shrinkage, so avoiding splitting. The screw serves to hold the runner in place rather than to provide direct support.
Since there is no end to which the centre runner can be attached, another method has to be adopted here. It depends in a measure upon the kind of back being fitted. If there is a fairly substantial muntin in the middle it is often possible to cut a groove across it and allow the back end of the runner to rest in this. If this is not practicable the simplest alternative is to introduce a hanger at the back, as shown in Fig. 1. This can be conveniently dovetailed into the top rail. At the bottom it is again dovetailed, this time into the runner itself. The fixing at the front is by the stub-tenon as in the side runners. Skew nails again are advisable to prevent any tendency to pull out. Both edges are grooved for dustboards, and in this connection it should be noted that the back dovetail is set in at each side sufficiently to clear the grooves easily.
A guide is needed in the middle, and the best form is a plain square of wood glued and screwed directly on top. It is a good plan to make it slightly tapered in width so that there is a trifle more width at back than at the front, so giving easy clearance for the drawers. This is not essential, however. Many workers prefer to make the job exactly the same size back and front. What is important is that there is not less clearance at the back.
When there is a solid top to the carcase this prevents any tendency for the drawer to drop when opened.
Sometimes, however, a couple of rails are substituted, as in Fig. 1, and this calls for the use of a kicker as shown. One only is needed because the rails are built out in their width at the ends and provide the necessary support. The strongest method is to frame the kicker between the rails before the last named are glued to the ends. Alternatively, a stub tenon can be cut at the front only, the back being butted. There is sufficient give in the wood to enable the tenon to be inserted and the back pressed down. A couple of nails can then be driven in askew, one at each side.
— MB


