
How To Sharpen Moulding Plane Cutters –
This is an excerpt from “The Woodworker: The Charles H. Hayward Years: Volume I” published by Lost Art Press.
Moulding plane cutters are of two kinds; those used with wooden moulding planes, and those made for the Stanley Universal plane. Except that the latter type is short, whilst the former have a long projecting part which reaches up beneath the wedge, there is little difference between them, but there is one feature which affects the sharpening; the wooden plane cutter must be sharpened so that its edge follows the shape of the sole, whereas there is no shaped sole in the universal plane. This means that, although it is desirable for the cutter to keep its original shape as far as possible, it is not vital.
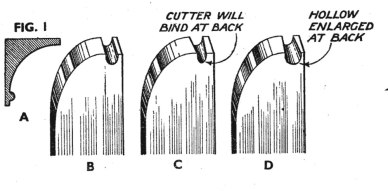
Since the sharpening of the wooden moulding plane is the more exacting job of the two, we will deal with it here. When first obtained, the cutter is ground to the shape of the sole, and it requires only to be given a keen finishing edge with oilstone slips. As an example take the cutter in Fig. 1 which will work the moulding section, shown at A. Two separate operations have to be carried out; the small hollow shape which works the bead has to be sharpened with a small round slip, and the rounded portion which forms the hollow has to be treated either with a flat slip or on the ordinary oilstone.
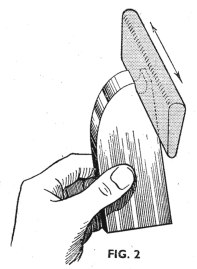
Take first the small hollow. Select an oilstone slip which approximates to the shape when it lies along the bevel. The fact that it fits or not when held at right angles to the cutter is no test. Place the slip flat on the bevel. If anything it should be of slightly smaller section. Apply lubricating oil, and, holding the cutter at the edge of the bench, as in Fig. 2, rub the slip back and forth. Do not consciously start a fresh bevel, but press the slip slightly towards the cutting edge, otherwise there will be a great deal of metal to remove and the work will take a long time. Avoid dubbing over, however.
One important point must be watched. In an endeavour to get an edge quickly there is a temptation to rub the sides of the shape at the cutting edge only, so that the bevel begins to assume the tapered shape, shown at C, Fig. 1. This is clearly impractical because the back or heel of the bevel is narrower than the shape at the cutting edge, and it will be liable to bind. If anything the bevel should taper the other way as at D, this affording a slight clearance. Test for sharpness by seeing whether a burr has been turned up.
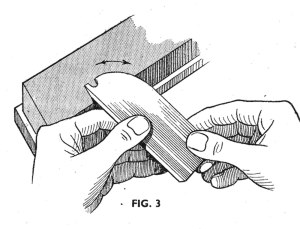
The rounded part of the cutter can be sharpened with a flat slip, or on the oilstone. Some men prefer one method, some the other. Fig. 3 shows the normal oilstone process. A sort of rocking movement is adopted, an effort being made to keep to the original bevel as far as possible. Finish off by reversing the cutter flat on the oilstone and rubbing back and forth once or twice.
Now place the cutter in the plane and, giving a minimum projection, see whether it follows the sole contour uniformly. If not, note the high parts and rub these down more. Note, however, that the corners of an old plane are bound to have worn more than the rest, and it would be an obvious mistake to follow these. Corners intended to be square should be square. When all is satisfactory strop the edge to a final keenness and so get rid of all burr. This can be done with a piece of leather dressed with oil and fine emery powder. If folded it will approximate to the shape. The back is stropped on leather held down on a flat board.
Some cutters are simpler than this; others more elaborate, but the principle is the same in all. If you have not a slip that will fit in a small hollow exactly (and it is unlikely that you will be able to buy an exact fit), you can always alter the section by rubbing it down on a piece of marble, using fine emery powder and oil or water as an abrasive. Extra hard stones may require fine carborundum powder.
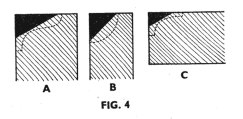
A little experience in sharpening a moulding cutter will convince you that it can be a lengthy operation, especially if really dull. The best plan, then, is to sharpen as soon as it shows signs of becoming worn, and to do as much preliminary work as possible with the ordinary bench plane which is clearly much more straighforward to sharpen. Fig. 4 shows three sections, in which the black portion could be removed first with the bench plane.
— MB


